Open menu with table of contents Assignments
Logo of Stuttgart Media University for light theme Logo of Stuttgart Media University for dark theme
Stuttgart Media University

Welcome to the MAD2 Assignments. These tasks will guide you through essential aspects of SwiftUI, SwiftData, and Http requests. In the upcoming video, you'll see the type of app you'll be creating.

Videos can't be printed.

Description: Assignment Video

Link: assets/assignments/pokedeck.mp4
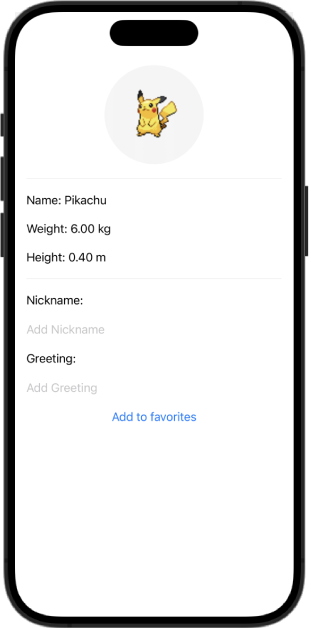
1 Project setup

First, we need a directory were we can put our work.

1.1 XCode project

  • Create a new iOS App project with XCode
    • Name: Pokedeck
    • Organization identifier: de.hdm-stuttgart
    • Interface: SwiftUI
    • Storage: SwiftData
    • Include tests: true
  • Navigate with the finder to a directory (e.g. cd ~/projects/mad2)
    • Before you click Create, disable "Create Git repository on my Mac" (we want to clone our own)

1.2 Git repository

  • Open a terminal and navigate to your XCode project (e.g. cd ~/projects/mad2/pokedeck)
  • Clone your git repository git clone mad2/mad2-**semester**/**student-short** .
    • The . at the end of the command tells git, to clone the repository into the current directory without a new folder
  • Open the directory with the finder and check, if the structure looks like this (click CMD + Shift + . to toggle hidden files visibility):
    • .git
    • Pokedeck
    • Pokedeck.xcodeproj
    • PokedeckTests
    • PokedeckUITest
    • README.md
  • Run git status to check, if new untracked files from the XCode project are listed

1.3 Git ignore

Before the start coding, we want git to ignore some files when committing

  • Create a file .gitignore (e.g. in XCode) in the root of your directory
  • Here is an example that you might want to extend during the semester
.DS_Store

2 SwiftUI Views

In the first assignment we build our first views with SwiftUI and a model for our favorite pokemons.

2.1 Our first view

  • We want some structure in our codebase: Create a group View where we can put all View-files.
  • For our first View create a SwiftUI file named FavoriteDetailView
  • Build the view according to the screenshot

Tipps

  • You could use the following SwiftUI Views: ScrollView, VStack, Divider, Text
  • You can use the following snippet for the placeholder image
Color.gray
  .frame(width: 140, height: 140)
  .clipShape(Circle())
  .frame(maxWidth: .infinity)

iPhone Screenshot showing a gray circle and some pokemon details like the name and weight

2.2 Our first model

At the moment the displayed data in our view are hardcoded. We want to change our view to display the data based on a property. Therefore, we need a model.

  • Again, we want a structured codebase. Create a group Model, where we can put our Model-files.
  • Create Swift file FavoritePokemon
  • Implement a class FavoritePokemon with the properties (id, name, greeting, nickname, height, weight, imageUrl). Choose matching types on your own.
  • Create an init function to set the properties
  • id should be typed as UUID (part of Foundation). Everytime we create a new instance of the model, we want a random id (therefore the property should be set automaticaly and not be part of the constructor).

2.3 Combine model and view

Now we can use that model in our view.

  • Add a variable pokemon to our FavoriteDetailView
  • Initialize the View in the #Preview with a Pokemon (e.g. Pikachu)
  • A valid imageUrl for pikachu is: https://raw.githubusercontent.com/PokeAPI/sprites/master/sprites/pokemon/25.png
  • Use the pokemon properties in the view for the text labels
  • Display the weight with kg and height with meters (you need to apply proper formatting, e.g. 2 digits)
  • Your view should now change according to the data you pass as a FavoritePokemon-model inside the #Preview

2.4 Generic image view

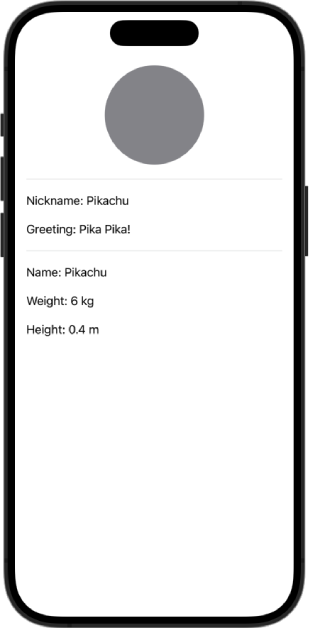
Our image is still a gray circle. We want to reuse the image functionality later, and therefore create a reusable view.
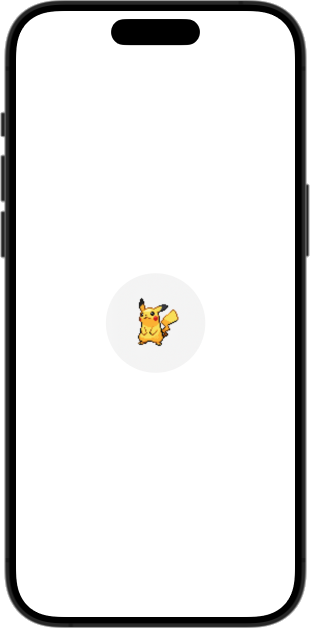
  • Create a new SwiftUI file called PokemonImageView
  • Create two variables url and size. Size should have a default value (e.g. 140)
  • Modify the #Preview and pass values for the two properties (you can use the url from above)
  • To display an image from a URL, SwiftUI provides a view called AsyncImage
    • Use an AsyncImage in the body (checkout the docs)
    • Handle image resize, pladeholder and the error state (e.g. a red color)
    • Resize the AsyncImage to the size property of the class
    • Use SwiftUI to style the image according to the screenshot
  • Nice, we now have a reusable image view to display pokemon avatars across our app

iPhone screenshot shwowing a filled grey circle with a pikachu image in the center

2.5 Combine our custom views

  • We can now replace our gray circle in the 
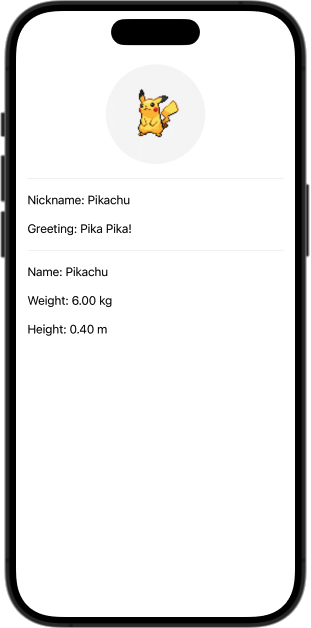
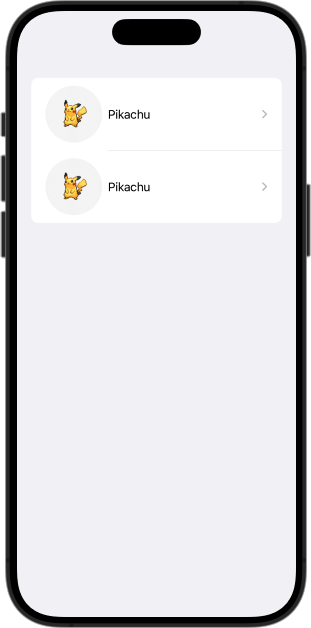
FavoriteDetailView with our PokemonImageView
  • Nice, we have our first View, with pokemon model and an reusable ImageView

iPhone Screenshot showing a gray circle with pikachu in the center and some pokemon details like the name and weight

In the final state, our app has two list views that we can access through tabs. In this assignment, we create the basis and implement the navigation.

3.1 First list view

  • The screenshot display the final design of our favorites list
  • Create a SwiftUI file FavoritesListView
  • The view should have a variable favoritePokemonList which is a list of FavoritePokemon-model
  • Setup the #Preview and pass a list containing at least one pokemon
  • Modify the body to display a list according to the screenhot
  • Use a NavigationLink around the image and label to navigate to the FavoriteDetailView on tap
    • Can you click view? Is it disabled? Well, we need a NavigationStack around our list
  • You should now be able to navigate in the preview mode between the two views

Tipps

  • You could use the follwing SwiftUI views: NavigationStack, List, ForEach, Navigation, HStack
  • ForEach requires items to implement the protocol Identifiable

iPhone screenshot displaying a list of two items. Each item has a pikachu image and the label Pikachu.

3.2 Tab Navigation

  • We now want a TabView in our app to navigate between the two main views
  • Create a new SwiftUI file SearchListView (we just use it as a placeholder for now)
  • XCode created some example code for SwiftData in the starter app, that we have to remove
    • Open ContentView and remove everything and just keep the empty body variable
    • Modify the body to contain two tabs: SearchListView, FavoriteListView
    • Add an image and label for each tab
  • You should now be able to navigate between the tabs

Tipps

  • Look up the usage of TabView and .tabItem for the tab navigation and styling
  • To find icons you can install the SF Symbols App

iPhone screenshot displaying a tab view at the bottom. The two tabs are search and favorites. The favorite tab is selected, displaying a list view.

4 PokeApi

Next we build our first service, that helps us to get the pokemons from an API.

4.1 PokeApi Service

  • Again, we want some structure in our codebase: Create a group Api where we can put all Api-related files.
  • Create a new swift file: PokeApi
  • Add a constant mock and an init function to set the variable. The default should be false. We see in the next assignment, why we need that variable.
  • The Api will have two functions, that return a list of pokemons or a specific pokemon
  • First, we create two structs inside the PokeApi
    • PokemonListItem (id, name, imageURL)
    • PokemonDetail (id, name, height, weight, imageURL)
    • Tipp If we define the structs inside the class, we get a nice abstraction if we use them outside of the class (e.g. PokeApi.PokemonDetail or PokeApi.PokemonListItem)
  • Implement a function getPokemonList
    • It should be async
    • It should return the list (Array) of PokemonListItem as an optional
    • It has to implement the protocol Identifiable. Add a comment in the code (it will be graded), why we have to implement that. Here is a link to the documentation
    • Return a manually created list with multiple entries (we got your back ;) ):
PokemonListItem(id: 25, name: "Pikachu", imageUrl: "https://raw.githubusercontent.com/PokeAPI/sprites/master/sprites/pokemon/25.png"),
PokemonListItem(id: 1, name: "Bulbasaur", imageUrl: "https://raw.githubusercontent.com/PokeAPI/sprites/master/sprites/pokemon/1.png"),
PokemonListItem(id: 4, name: "Charmander", imageUrl: "https://raw.githubusercontent.com/PokeAPI/sprites/master/sprites/pokemon/4.png"),
PokemonListItem(id: 7, name: "Squirtle", imageUrl: "https://raw.githubusercontent.com/PokeAPI/sprites/master/sprites/pokemon/7.png")
  • Implement a function getPokemonDetail
    • It should be async
    • It should require a parameter id
    • It should return the struct PokemonDetail as an optional
    • Return a manually created PokemonDetail instance

4.2 SearchListView

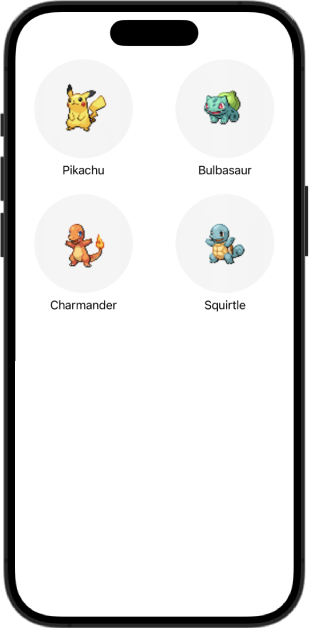
Now we can implement our SearchListView, that is currently a placeholder.

  • We need two variables
    • One for the PokeApi.
    • One for a list of type PokeApi.PokemonListItem. For now, you can initialize the list with the same static pokemons like the PokeApi.
  • Initialize the api variable in the #Preview macro and update your ContentView to pass an instance to the SearchListView.
  • Create your view according to the screenshot. Here are some helpful SwiftUI views: NavigationStack, ScrollView, VStack, LazyVGrid.
  • Inside the LazyVGrid use ForEach to display the pokemons.

Tipp:

Here is some code for the LazyVGrid:

LazyVGrid(columns: [GridItem(.adaptive(minimum: 140))]) {
  // inside the grid
}

iPhone displaying two columns with pokemons

4.3 Use PokeApi

Now, we want to use our PokeApi inside our view.

  • First, change the pokemon list in our view to an empty list (remove the pokemons).
  • We can use the .onAppear method on the NavigationView to do something, when the view appears (Remember the lifecycles we talked about?).
  • To call the async function PokeApi.getPokemonList() with await we can use a Task.
  • After awaiting the result, use it to set our pokemon list variable. You propably get an error, because we have no @State decorator for our variable. Add a comment in your code, why this is necessary: Link to doc)

4.4 SearchDetailView

We are almost done. We only need the detail view for the search.

  • Create a new View: SearchDetailView
  • Build the view according to the screenshot.
  • Nickname and Greeting can be set by the user: Use a SwiftUI TextField with a bind to a variable Link to doc
  • For now, the button can have an empty action (closure without content)
  • The view needs pokemonId as variable. Use the same logic like in our PokemonSearchView to load a PokemonDetail from our PokeApi when the view appears and use that response to set the variables for our view.
  • Finally, use a NavigationLink in the SearchListView that opens SearchDetailView when we click on a pokemon in the grid.

iPhone showing a pokemon image with some labels, two input fields for greeting and name, and a button.

5 HttpApi

This assignment is based on a co-programming session in the class. We implement a Http service together and explain it in detail step by step.

5.1 Http helper

This is the code from the session:

import Foundation

class HttpApi {
    private enum ApiError: Error {
        case invalidUrl
        case unexpectedStatusCode
        case connectionFailed
        case invalidJSON
    }

    private static let pokeAPIBaseURL = "https://pokeapi.co/api/v2"
    private static let pokeAPIImageBaseURL = "https://raw.githubusercontent.com/PokeAPI/sprites/master/sprites/pokemon"

    private struct PokemonListResponseItem: Decodable {
        let name: String
        let url: String
    }

    private struct PokemonListResponse: Decodable {
        let results: [PokemonListResponseItem]
    }

    private struct PokemonDetailResponse: Decodable {
        let id: Int
        let name: String
        let height: Double
        let weight: Double
    }

    private static func get<T: Decodable>(url: String) async throws -> T {
        guard let parsedUrl = URL(string: url) else {
            throw ApiError.invalidUrl
        }
        let request = URLRequest(url: parsedUrl)
        let data: Data
        let response: URLResponse

        do {
            (data, response) = try await URLSession.shared.data(for: request)
        } catch {
            print(error)
            throw ApiError.connectionFailed
        }

        if (response as! HTTPURLResponse).statusCode > 299 {
            throw ApiError.unexpectedStatusCode
        }

        do {
            return try JSONDecoder().decode(T.self, from: data)
        } catch {
            print(error)
            throw ApiError.invalidJSON
        }
    }

    static func getPokemonList() async -> [PokeApi.PokemonListItem]? {
        do {
            let response = try await get(url: "\(pokeAPIBaseURL)/pokemon?limit=151") as PokemonListResponse
            var pokemonList: [PokeApi.PokemonListItem] = []
            for pokemon in response.results {
                let id = getPokemonIdFromURL(url: pokemon.url);
                pokemonList.append(
                    PokeApi.PokemonListItem(
                        id: id,
                        name: pokemon.name.capitalized,
                        imageUrl: getPokemonImageURL(id: id)
                    )
                )
            }
            return pokemonList
        } catch {
            print(error)
            return nil
        }
    }

    private static func getPokemonIdFromURL(url: String) -> Int {
        return Int(url.split(separator: "/").last!) ?? -1
    }

    private static func getPokemonImageURL(id: Int) -> String {
        return "\(pokeAPIImageBaseURL)/\(id).png"
    }
}

5.2 Use the HttpApi

  • Implement another function getPokemonDetail(id) that calls the pokemon HTTP api and returns a PokeApi.PokemonDetail
  • Extend the PokeApi service to either return the static example data or call the HttpApi depending on the variable mock
  • All #Preview macros should initialize the PokeApi with mocked data (Check with XCode preview).
  • Inside the PokedeckApp: The ContentView should initialized with the PokeApi with actual HTTP data (Check with the simulator).

6 SwiftData

In this assignment we add a persistence layer to our app, to add pokemon to or delete pokemon from our favorites list.

6.1 Query

  • We start from small to big. First comment out the FavoriteListeView in our ContentView file
  • Lets make our FavoritePokemon class a SwiftData model. Thus, we have to add the @Model decorator.
  • Lets connect our first view to SwiftData. We start with querying data from the persistent store.
  • Refactor the FavoriteListView to use @Query() instead of initializing the favoritePokemonList
  • To make our preview work, we need a temporary ModelConfiguration, Container and have to insert a pokemon in our context

Here is a code snippet (you just have to replace the MODEL placeholder):

let config = ModelConfiguration(isStoredInMemoryOnly: true)
let container = try! ModelContainer(for: MODEL.self, configurations: config)

container.mainContext.insert(MODEL())

return ContentView(api: PokeApi(mock: true)).modelContainer(container)

The preview should no work and display the pokemon that you insert into the mainContext.

6.2 Cleanup

  • From the SwiftData starter app, we have some leftovers to clean up:
    • Modify the PokedeckApp file to use our FavoritePokemon model.
    • You can now delete the Item.swift file (if you haven't done that already)
  • Refactor the ContentView
    • Update the TabView to correctly initialize the FavoriteListView
    • Update #Preview to also use a ModelContainer. It's almost identically to the #Preview of our FavoriteListView.
    • Check if the preview works and you can open the favorite list tab.

6.3 Insert

  • We now, want to add pokemon to our favorite list, which happens in our SearchDetailView
  • We need the model context from the environment: @Environment(\.modelContext) private var context
  • Implement an new function addPokemonToFavorites
    • It should initialize a new FavoritePokemon
    • Use a suitable method of the modelContext to add the pokemon.
    • Connect the method with the button in your view.
  • You should now be able to add multiple pokemon, and they appear in the favorite list
  • Do you understand why we don't have to modify the #Preview of this view?

6.4 Delete

  • We can query and insert favorite pokemon, so our last step is the deletion. We want to be able to delete pokemon in the list view with a swipe gesture and in the favorite detail view with a toolbar button.

FavoriteListView

  • Add the modelContext via the environment
  • ForEach has a .onDelete method there you can apply some logic on the swipe to delete gesture
  • Implement a function to delete a pokemon and call it with .onDelete
    • The default argument that .onDelete passes to our function is an IndexSet (a list of indexes)
    • Iterate over the indexes
    • Get the pokemon at each index of the favoritePokemonList
    • Pass it to a function of our model context, that deletes the model entry

FavoriteDetailView

  • Add the modelContext via the environment
  • Implement a function that deletes the pokemon
  • We want an IconButton in the toolbar, where we can delete the current pokemon. ScrollView has a .toolbar function, where we can add ToolbarItem.

Here is the code for a ToolbarItem:

ToolbarItem(placement: .topBarTrailing) {
    Button(action: {
        deletePokemon()
    }, label: {
        Image(systemName: "trash").foregroundColor(.red)
    })
}
  • Note, that Swift preview won't display the toolbar if we open the file FavoriteDetailView. The toolbar is part of the NavigationController and therefore we have to open the preview on level higher (e.g. FavoriteListView)

6.5 Test SwiftData

  • Finally, check if you can add, query and delete favorite pokemon:
    • In the previews the state should not be peristent
    • In the simulator the state should be persistent (e.g. added pokemon should appear after a restart)

7 Usability enhancements

Now that the basic functionality works, we want to enhance the usability a little.

UI

We add a search field to quickly find pokemon.

  • SearchListView
    • Add a TextField above your LazyVGrid
    • It should bind the state to a variable e.g. searchText
    • TextField has a v.onChange(of: searchText)` method, to execute something on a change

Here is some styling for the TextField:

.padding(8)
.background(.thinMaterial)
.cornerRadius(10.0)

Data

  • The idea is two have two lists, e.g. allPokemonList (for the result from the api) and filteredPokemonList (for the current state based on the search input)
  • We already have a pokemonList variable that is filled with all Pokemon from the API
  • Now we need a second list, that is filtered according to the searchInput. On change of the searchInput the list is updated.
  • Create a new variable e.g. filteredPokemonList
  • ForEach renders the filtered list
  • Implement a function filterPokemonList that takes a string as an argument and return a [PokeApi.PokemonListItem]. Return the full pokemon list first (we do we filtering later).
  • Call that method in onChange of the TextField and assign the result to your filteredPokemonList
  • Call the method onAppear, after loading the pokemon from the API.

Filtering

  • Implement the filter function. If searchText is empty, return the full list else here is the code:
allPokemonList.filter {$0.name.lowercased().contains(searchText.lowercased()) }
  • Test your app: First all pokemon should be listed. When you enter something in the search field, the results should filter accordingly. If you clear the search field, all pokemon should be listed again.

7.2 Alert

To prevent you users from accidently deleting a pokemon in the detail view, we can implement an Alert that is displayed first and has to be confirmed.

  • Open the file FavoriteDetailView
  • Create a new state variable showAlert, default should be false.
  • ScrollView has a method .alert: Dokumentation
    • Set a title
    • Bind isPresented to your state variable.
    • Create one Button in the actions that has the role .destructive and deletes the pokemon. A second button to cancel the alert is automatically present.
    • Create a Text for the message view.

Here is some code:

.alert("Alert Title", isPresented: $bindingVariable) {
    // Buttons with actions
} message: {
    // text to display
}
  • Change the Button of the toolbar to not delete the pokemon, but display the Alert instead.
  • Test your app, if the alert is displayed and you can abort or delete a pokemon.
  • It is nice to have titles on a views that are shown inside a TabView, e.g. if the favorites are empty, at least a title is shown.
  • You can use .navigationTitle on you ScrollView or List. E.g. for the views SearchListView, FavoritesListView.

Currently, if you add a pokemon or delete one from the detail view, the current view is still displayed. It is a nice enhancement, to automatically close the view and for example show the list of pokemons after the action.

  • Modify your detail views to use the environment object presentationMode to dismiss the current view (on both detail views).
// Env
@Environment(\.presentationMode) var presentationMode

// Dismiss a view
presentationMode.wrappedValue.dismiss()

8 Testing