Open menu with table of contents iOS Development - Testing & Deployment
Logo of Stuttgart Media University for light theme Logo of Stuttgart Media University for dark theme
Mobile Application Development 2

iOS Development - Testing & Deployment

Stuttgart Media University

1 Agenda

  • Unit Testing & UI Testing in Xcode
  • App Deployment via App Store
  • Human Interface Guidelines

2 IOS Testing

  • Xcode supports two different types of tests with the XCTest framework:
    • Unit Tests: Testing functionality of single components (units) of your software
    • UI Tests: Automatic testing of the UI

3 Test Driven Development

Test Driven Development (TDD) is a discipline in agile software development. There are three laws of TDD:

  • Write production code only to pass a failing unit test.
  • Write no more of a unit test than sufficient to fail (compilation failures are failures).
  • Write no more production code than necessary to pass the one failing unit test.

The development flow of TDD is:

(Iteration start) -> Red -> Green -> Refactor -> (Next iteration)

  • Red: Write a test that fails
  • Green: Implement code (as quickly as possible) that makes the test pass
  • Refactor: Clean up and improve code

Do as many quick iterations as needed until all requirements are met.

(P.s.: As we always get new requirements, this usually never ends 🤣)

4 Unit Tests

  • In order to create a test, import the XCTest framework and define a class that extends XCTestCase
  • A Unit test uses the @testable import declaration to import the app code into the test target in order to run the tests. It allows the test classes to access the functions and properties of your app classes without needing to change anything in your original code
import XCTest
@testable import UnitTestProject

class UnitTestProjectTests: XCTestCase {
   ...
}

5 Unit Tests

  • XCTestCase has two methods, one to setup and one to teardown the test context.
  • Implement those methods to make sure the test are alway run under the same conditions, e.g. create certain object or database table entries in the setUp() and remove them in the tearDown() method.
override func setUpWithError() throws {
        // Put setup code here. This method is called before the invocation of each test method in the class.
}

override func tearDownWithError() throws {
        // Put teardown code here. This method is called after the invocation of each test method in the class.
}

6 Unit Tests

  • Unit tests should be independable of each other and cover
    • the core functionality such as model classes and methods and their interactions with the controller
    • The most common UI workflows
    • Boundary conditions
    • Bug fixes
  • Create a test method for each test such as e.g.:
func testExample() throws {
        // This is an example of a functional test case.
        // Use XCTAssert and related functions to verify your tests produce the correct results.
}

7 XCTestCase Methods

  • XCTestCase is the primary class for unit testing.
  • It supports to define handling test case failure with the property continueAfterFailure: Bool and executionTimeAllowance: TimeInterval
  • It supports measuring performance using the measure() methods
  • You can create asynchronous tests, e.g. when working with REST APIs. Use the expectation() methods for this.
  • Synchronous calls can be done using the wait() methods
  • The framework supports multiple XCTAssert() methods for testing, e.g. boolean, nil and non-nil, equality, value comparison and other assertions, e.g.
func testExample() throws {
    let x = 0
    XCTAssertTrue(x == 0, "Unexpected: x should be 0")
}

Testing asynchronous operations example (see here):

func testDownloadWebData() {
    
    // Create an expectation for a background download task.
    let expectation = XCTestExpectation(description: "Download apple.com home page")
    
    // Create a URL for a web page to be downloaded.
    let url = URL(string: "https://apple.com")!
    
    // Create a background task to download the web page.
    let dataTask = URLSession.shared.dataTask(with: url) { (data, _, _) in
        
        // Make sure we downloaded some data.
        XCTAssertNotNil(data, "No data was downloaded.")
        
        // Fulfill the expectation to indicate that the background task has finished successfully.
        expectation.fulfill()
        
    }
    
    // Start the download task.
    dataTask.resume()
    
    // Wait until the expectation is fulfilled, with a timeout of 10 seconds.
    wait(for: [expectation], timeout: 10.0)
}

8 Swift Testing

The Swift Testing framework is the new testing framework for Swift applications since Sept 2024. It is a modern testing framework that is easy to use and provides a lot of features for testing Swift code.

  • It is built on top of XCTest
  • Heavily relies on Swift Macros such as:
  • @Test
  • #expect
  • #require

@Test func testExample() {
    #expect(1 + 1 == 2)
}

9 Swift Testing - Parameterized Testing

It supports parameterized testing using @Test with arguments:


@Test("Continents mentioned in videos", arguments: [
    "A Beach",
    "By the Lake",
    "Camping in the Woods"
])
func mentionedContinents(videoName: String) async throws {
    let videoLibrary = try await VideoLibrary()
    let video = try #require(await videoLibrary.video(named: videoName))
    #expect(video.mentionedContinents.count <= 3)
}

10 Swift Testing - Custom Test behaviors

You can customize the behavior of tests or test suites using traits specified in your code. Traits can describe the runtime conditions for a test, like which device a test should run on, or limit a test to certain operating system versions. Traits can also help you use continuous integration effectively by specifying execution time limits for your tests.


@Test(.enabled(if: AppFeatures.isCommentingEnabled))
func videoCommenting() async throws {
    let video = try #require(await videoLibrary.video(named: "A Beach"))
    #expect(video.comments.contains("So picturesque!"))
}

11 Swift Testing - Error Matching

To check that the code under test throws a specific error, or to continue a longer test function after the code throws an error, pass that error as the first argument of expect(throws:_:sourceLocation:performing:), and pass a closure that calls the code under test:


@Test func cannotAddToppingToPizzaBeforeStartOfList() {
  var order = PizzaToppings(bases: [.calzone, .deepCrust])
  #expect(throws: PizzaToppings.Error.outOfRange) {
    try order.add(topping: .mozarella, toPizzasIn: -1..<0)
  }
}

12 Swift Testing - Test Suites

When working with a large selection of test functions, it can be helpful to organize them into test suites.


@Suite("Food truck tests") 
struct FoodTruckTests {
  @Test func foodTruckExists() { ... }
}
13 UI Test

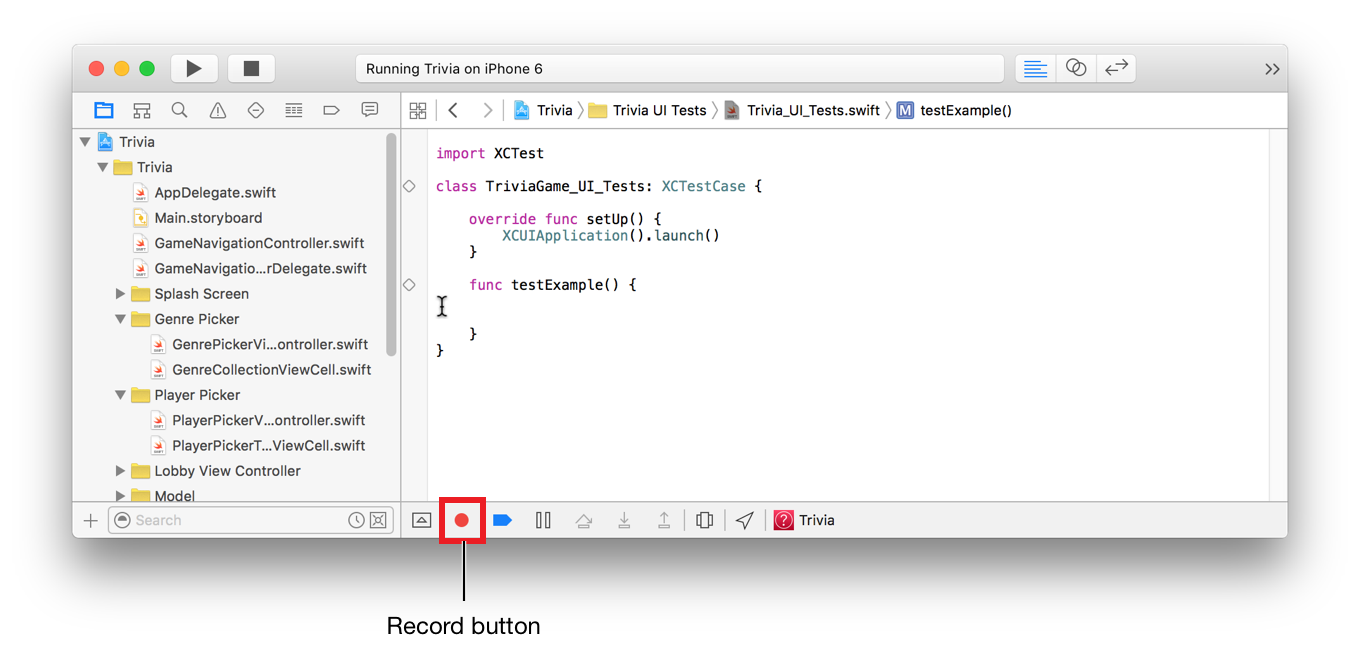
  • UI test can be used to automatically test user interactions with the User Interface
  • You can select UI objects and examine properties and compare them to an expected state
  • UI tests can be easily recorded using the recording feature in Xcode
  • After recording you can manually extend the tests and use assertions as usual

center 50%

Source: Apple

14 IOS Deployment

  • To install an application on your iOS device, only an Apple account is required (since Xcode 7 and iOS 9)
  • A developer license is needed ($99 (single) - $299 (enterprise) /year), only if you want to provide the app via the AppStore or distribute it directly within your company.
  • For more information see https://developer.apple.com/xcode/

15 Ad-Hoc App Provisioning

  • For testing purposes or in case of a enterprise deployment process apps can be distributed ad hoc, i.e. without using the Apple App Store
  • Examples for development ad-hoc provisioning tools are:
    • App Store Connect (incorporated former TestFlight)
      • Distribute Beta App to up to 1000 testers
    • AppCenter (formerly HockeyApp: http://hockeyapp.net)
      • Professional service for app provisioning, analysis and debugging
      • Not only iOS but also Android and Windows Apps
      • https://appcenter.ms/

16 App Store Deployment Process

  • Submit the app to the app store:
    • Login using the developer account at App Store Connect (https://appstoreconnect.apple.com)
    • Register new app and provide meta information
      • Language, app-name, SKU number, bundle-ID
    • Provide images and description for the app
    • Upload the app
  • After the upload the app is verified by Apple
  • Verification process takes max. 1-2 weeks often 2-3 days, then the app is available in the App Store

17 iOS Human Interface Guidelines

In order to get your app through the Apple validation process, you should make sure that you meet Apples requirements concerning app behaviour (using only allowed frameworks) and also the Human Interface Guidelines:

  • Describes how an iOS app has to be designed in order to gain a good user experience
  • Contains hints and guidelines to for example:
    • Platform-specific characteristics
    • Human interface design principles
    • App design strategies
    • User experience guidelines
    • Hints for creating graphics and icons
    • Hints for how to use iOS GUI elements

Source